Handmade Knife Grinding Jig
Grinding perfect knife lines by hand is hard. There’s no doubt about it. The purists will tell you that it’s the only way to be done , but I’m not a purist… I can’t afford to be. Some guys have the CNC machines to cut out their knife blanks perfectly, and high end fancy belt sanders to profile like a pro, but I don’t..unfortunately. I have to use what’s at my disposal and its limited. I have a basic belt sander and a small shop of goodies to use. So for the people like me who aren’t pumping out blades like a production shop, and who have a smaller budget to work with, a jig can go a long way. Let’s keep in mind as well that a jig will get you your bevel, but there’s always a fair bit of hand sanding and profiling to do too.
Jig design is all up to you. It depends on what materials you have to make it with, what kind of tools are at your disposal, what kind of grinding method you use, and what kind of knife you’re making.
In my case I have mostly SS and mild steel to work with. I have a small stick/TIG welder to make it with. I’ll be using my little 42″ belt sander to do the stock removal, and I’m focusing on small length blades like oyster knives and small hunters, carvers, skinners, etc.
Do your research. There’s a lot of designs online that will help you get ideas about your options. My belt sander has a relatively small backrest and toolrest, so I needed a jig that fit those rests. I researched some small DIY knife jig designs online and found some options that used materials that were easy to scrounge up at the local hardware store.
Here’s what I made. With a couple heavy duty door hinges, some angle iron, and some ready rod, we’re in business.

First lets drill and tap a hole in the angle to support the ready rod. I used 1/2″. Overlap the hinge plate on the angle piece and weld together. Now you have a u-shaped bracket with one side of the hinge plate still able to move. Now cut a piece of ready rod that fits the jigs needs and weld a nut to one end to make a bolt out of it. Insert the bolt into the jig and line up the last hinge right on top of the bolt and butting up to the other moveable hinge plate. See the pictures to get a better sense of whats going on here. Now weld the hinges together, making sure you’re centering everything on the bolt. Finally the last step is to complete the points that need to be secured. The bolt still needs to attach to the last hinge in order for the jig to be able to adjust as you need it. Thread a nut onto the start of the bolt and line up a flat of the nut with the hinge plate on top. Adjust the bolt as you need to get the whole jig at right angles. Now weld the nut and hinge plate together.
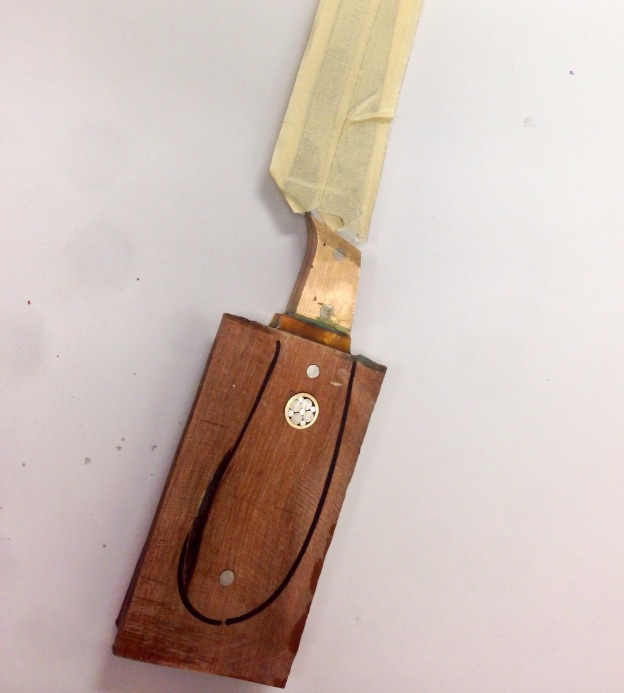
Ok you’ve got a working jig now! The picture above shows an oyster knife I’m grinding with the jig. I’m still using a couple of small c-clamps to clamp the blanks to the jig during grinding but I’ll probably incorporate a welded on, low profile bolt-and-U clamp when I get some extra time to design and make one. There you have it! I hope you enjoy it. If you’re having difficulty with adjusting to the perfect angle of grind, don’t hesitate to modify the design as you see fit. Like I said, I’m using this jig for small profile knives only. If your belt sander tool rest adjusts, you can also tune that in to fit the perfect angle of grind. I hope this helps in designing and making your own knife grinding jig!